
Omni CMS Website Training
Helpful Features and Tools
Editing a website for the first time can, understandably, be overwhelming. There are a few features and tools, however, that will help make the experience much easier.
Filter Bar and More Actions Button
In 'Pages' view, there is a filter bar underneath the 'Upload' and 'New' button on the right-hand side of your screen (pictured below)

This can be used quickly search the folder you're currently in for a file. It's also helpful for finding your microsite in the event you've accidentally navigated away from it.
From the 'Pages' view, there is also a 'More Actions' button that can be selected on any file or folder. This icon has three dots and can be found on the right-hand side of your screen (pictured below)

Clicking on this will open a menu for that file or folder that allows you to 'Edit', 'Review', 'Publish' or more (pictured below)

Selecting 'Edit', then 'File' will take you to the 'Edit' view for the page. When you have time, please take time to familiarize yourself with what is available here.
File Explorer
When inserting a link or image, you may have noticed that there is an icon at the end of the first field. Selecting this icon, which looks like a browser window with an arrow pointing upwards (pictured below), opens a file explorer.

This file explorer allows you to search for the file that you'd like to use for the page. When you insert a link or image this way, instead of displaying the full hyperlink, it displays the file number instead (pictured below)

Note that the filepath for the selected file can be seen below the field. This method is recommended since it preserves the link in the event the file is ever moved or renamed.
HTML Editor
Knowing and understanding HTML is not a requirement for editing your website, however, becoming familiar with a few coding concepts can improve your overall website editing experience. All website editors have an HTML Editor icon on their Omni CMS Toolbar (pictured below)

When you open your editor, you should get a pop-up for another editing window. Notice that everything that is on this page is further broken down into its respective HTML elements. Regular text are in paragraph tags (<p></p>), while the headings are in heading tags <h1></h1). Images are in image tags (<img></img>). Also notice that all of the sentences for this paragraph are all in one paragraph tag (<p></p>), while the first sentence on this page is in a paragraph tag (<p></p>) by itself. Tag placement affects the formatting for the page.
To better familiarize yourself with more coding concepts, we recommend checking out our WebDev site.
Snippets
Have you ever seen an element on someone else's microsite and wanted to use it for your site as well? Lets use the following button as an example:
Apply Now >
It's possible to add this button your page by selecting the 'Snippets' icon on your Omni CMS toolbar (pictured below)

When the 'Choose a Snippet' window opens, type 'button' in the 'Filter' field (pictured below)
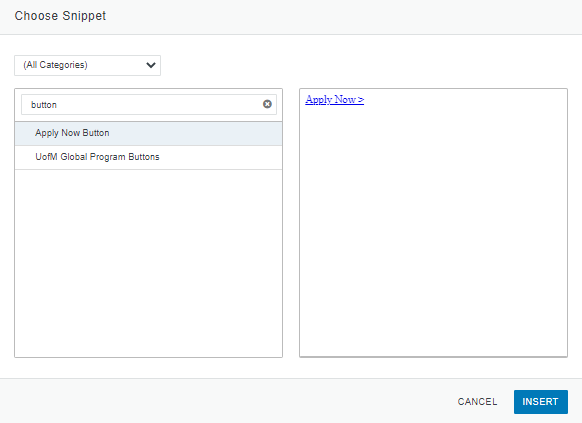
The name of the button is 'Apply Now Button'. To add it to your page, select it, then click on the blue 'Insert' button in the lower right-hand corner of this window.
To edit the text for the button, you can simply place your cursor on the text in the button and type in your changes.
However, you can also edit it with the HTML editor. To do so, open the HTML editor and look for the following section of code.
Button Code<a class="btn btn-primary btn-lg apply" role="button" href="#" aria-label="Apply Now" aria-pressed="true">Apply Now ></a></div>
The highlighted portions are the only things that you should change in this scenario. They should be identical. When you're done, select 'Save' and the changes should be applied automatically. Note that saving from the HTML editor does not save the page, so you'll still need to save the page via the blue 'Save' button in the upper right-hand corner.
If you ever add a snippet, and aren't sure how to find it in the code, one thing you could do is make note of where it is on the page (look for sentence above or underneath the snippet), open the 'HTML Editor', then press 'CTRL' + 'F' on your keyboard and search for the sentence with your browsers' 'Find in Page' function. The keyboard command for may vary depending on your primary browser and operating system.
In addition to buttons, there are also Snippets for accordion menus. For assistance with setting up one of these snippets, or to request that we add an already existing element to our Snippet Library, please submit a request to umhelpdesk.memphis.edu
Assets
Omni CMS Assets are actually a set of tools that vary in use from form creation to image gallery creation. Access to these tools are only granted upon request and only after you have already completed your Website Access training. Listed below are the types of assets that our site currently support:
- LDP Forms: Create forms, surveys or polls that do not require signatures. All responses are stored in Omni CMS.
- LDP Image Gallery: Create multi-image slideshows. Can be added to a page other than the main landing page for your microsite.
- Web Content: Add HTML-formatted text or media to a page (or set of pages).
- Plain Text: Add nonformatted text or media to a page (or set of pages).
- Source Code: Add source code to a page (or set of pages).
Assets are convenient since you can create one and use it on multiple different pages. If you've added the asset to multiple pages, but need to edit the asset, the good news is that publishing the asset automatically publishes all of the pages that have the asset on it.