
Omni CMS Website Training
About Your Microsite
A microsite is a collection of pages within another site. The Omni CMS training site is a microsite for the University of Memphis's website. The same is true for the site (or sites) that you will eventually maintain. Sometimes your microsite will be referred to as a directory or folder. All are correct.
Editing Pages
When you log-in for the first time, you are taken to the 'Edit' view for the page you signed in from. To begin editing your page, select the green 'Edit' button (pictured below)
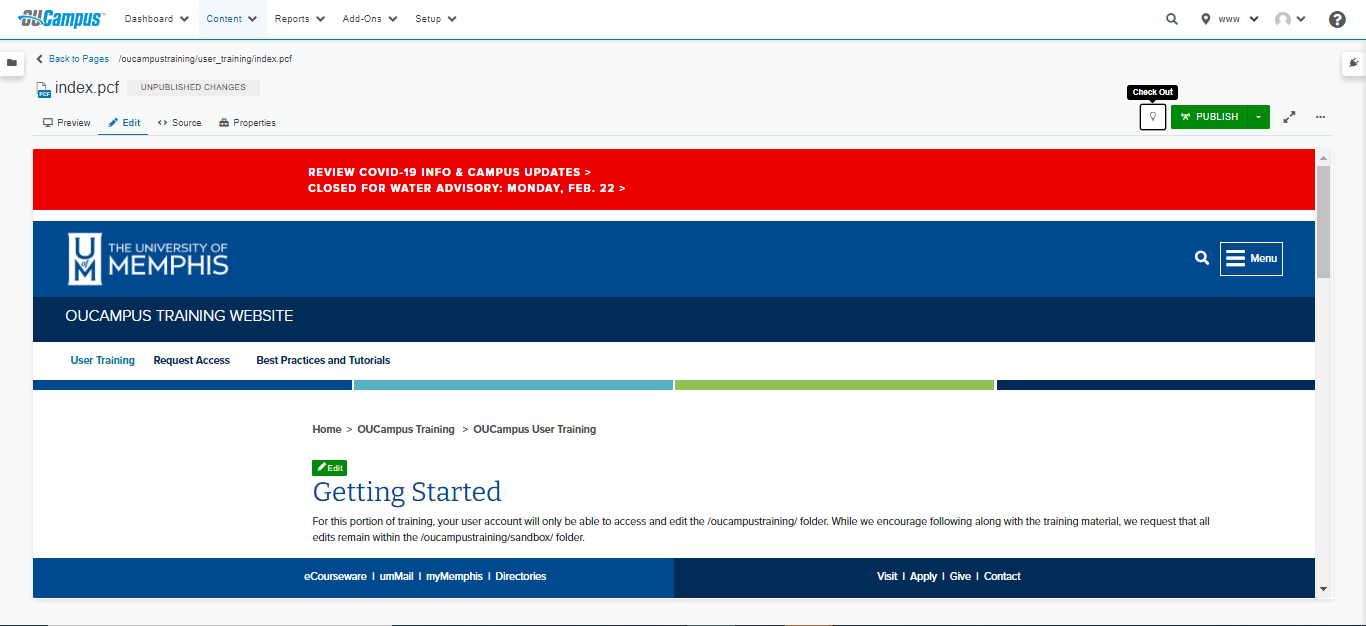
Lets take a look at your Omni CMS toolbar (pictured below)

Note that this toolbar is very similar to the toolbars that most text editors (like Microsoft Word, for example) use. For a brief description of what each of these buttons do, select the icon with a question mark (?) at the end of the first row.
Once you're more familiar with the formatting tools available here, you can begin editing your page by typing in the text box area of the page editor.
When you're done editing your page, select the blue 'Save' button in the upper right-hand corner, then select the green 'Publish' button. The changes should be live after a few seconds.
If you are not ready for the changes to be live, just 'Save' the page. Always save your work, this system will not automatically save if you navigate away from or close the page before you are done editing.
Profile/"Multiedit" Pages
Profile pages, slideshows, callouts and some other config pages are set up a little differently from regular pages. For these, you fill out the form, and they will be automatically formatted to fit the template.
Profile pages are divided into two differrent sections, so there are two different ways to add information. They still have the green 'Edit' button like other pages do, however, they also have a 'Multi-Edit' button (pictured below)
![]()
Selecting the green 'Edit' button will allow you to edit the content in the body of the profile, which is usually the information that is in paragraph form. To edit the top-most portion of the profile, select the 'Multi-Edit' button in the upper right-hand side of your screen.
This will take you to a form that you can fill out (pictured below)
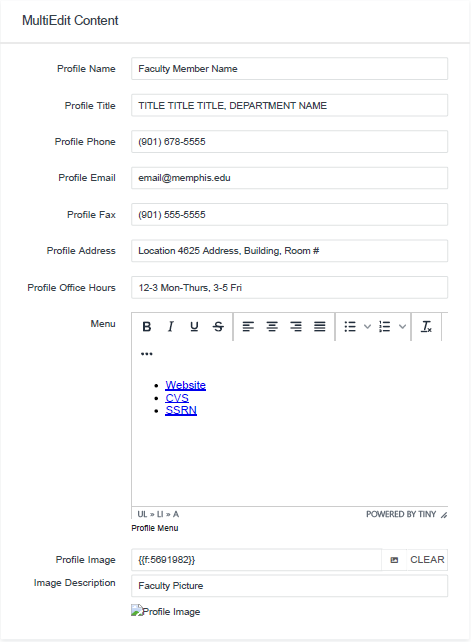
Helpful Definitions
Menu: Section for links to professional websites, research or CVs. This section is optional, so if you'd like to omit, then just highlight everything and delete
Profile Image: The link or file number for the slide image
Image Description: Description for the image used in the slide for accessibility compliance
Once you're done filling out the form, please select the blue 'Save' button in the upper right-hand corner. If your need to edit the rest of the page, then enter the 'Edit' view by selecting 'Edit' button on your toolbar, then selecting the green 'Edit' button on your page. After you're done making edits, 'Save' your page, then 'Publish'.
Navigating Your Microsite
As mentioned above, when you sign-in for the first time you are taken to the 'Edit' view for the page you signed in to. There are two ways to navigate in Omni CMS.
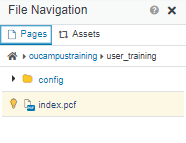
The first involves the 'Back to Pages' link at the top of the page. This link can be found right below the primary Omni CMS toolbar (pictured below)

Selecting this link takes you to the 'Pages' view for your microsite. This is where you can view the other pages and sub-directories/folders.
Alternatively, you can also use the 'Show File Navigation' button on the left-hand side of your screen. Clicking on a page from this menu will take you to the 'Edit' view of that page.
Creating a New Folder or File
Before creating a new folder or file, make sure that you are in the correct folder. From here, click on the blue 'New' button in the upper right-hand corner of your screen to add a new file or folder to your microsite.
To add a new
- Page: Select 'New Microsite Sub Page'.
- Folder: Select 'Create a New Folder'
- Profile: Select 'New Profile'
- Slide: Select 'New Slide' (** This should only be added to your /config/slideshow2019/ folder **)
- Section Config: Select 'New Section Config' (** This should only be added to a /maindirectory/subdirectory/config/ folder **)